A year ago I received a big order from Adafruit industries.

Among the things I ordered, was the camera for the Raspberry Pi, an Arduino UNO board, some accessories for the Arduino… and a pair of XBee with micro USB adapters!

(Link to buy the XBee and the USB adapters).
Ok… so I know the basics about XBee… it can be used to communicate using radio signals… but I don’t know more than that! It is now time to try a few things and learn.
Fortunately, the company that fabricates the XBee has examples on its webpage, and we can follow it to learn (you and me).
Basic XBee ZB ZigBee (Series 2) Chat
The above example explains how to use 2 XBee to communicate between 2 PC. I’m going to follow it trying to simplify/update the example and adding tips when needed.
Step 1. In order to use the USB adapters, we need to install drivers for them. They are here. Look for your OS and download and install the drivers in both PC. In my case, one computer is running Windows 7 x64 and the other one is running the no longer supported Windows XP x32. The driver worked fine on both.
Step 2. Now we need a software to communicate with the XBee through the USB port. That is called CoolTerm.
Download the one needed for your OS unzip and it is ready.
By the way… once you are in Roger Meier’s webpage… if you scroll down, you migth find a R2D2 translator which is quite funny to try.
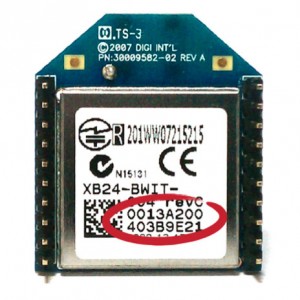
Step 3. You need to write down the numbers on the back of the XBee (top one is the High, and bottom one is the Low), name them A-Coordinator and B-Router.
Step 4. To tell the XBee who is the Coordinator and who is the router, you need to download X-CTU form here.
Once X-CTU is installedm connect the A-Coordinator and open X-CTU. Select the COM port and click “Test / Query” to see if X-CTU can communicate with the radio. The result should look like this (If not, try to diconnect/reconnect the USB and closing/opening the program).
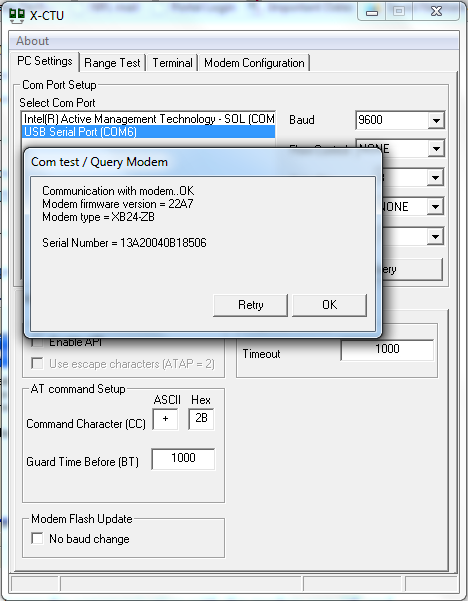
Now click the “Modem Configuration” tab on the top and then drop down the “Modem:” list. Select XB24-ZB . Then choose ZIGBEE COORDINATOR AT from the “Function Set” list. Finally, click “Write” to update the firmware.
Repeat the process with the B-Router, selecting ZIGBEE ROUTER AT from the “Function set list”.
Step 5. Now we need to setup our XBee using the CoolTerm program.
A-Coordinator. Connect the XBee named A-Coordinator using the USB and open the program. In the program, click options and Re-Scan Serial Ports. You will know which port the XBee is connected by repeating this step with and without the XBee USB adapter connected.

If it doesn’t show, most probably you need to restart the system or the drivers are not properly installed.
The parameters for the coordinator are:
- Baudrate is set to 9600.
- Be sure Data Bits is set to 8.
- Be sure Parity is set to “none.”
- Be sure Stop Bits is set to 1.
- In the list on the left side of the options window, click “Terminal.” Be sure “Local Echo” is activated.
Now hit ok and back in the main window, press Connect. You will see a “connect” message on the bottom left corner.

Now to set the firmware you need to write this commands very fast. The first one, +++ opens the command mode (it will close by itself in 10 s). The rest just set up the connection. ATDH is the same for all, ATDL has to be the Low number on your B-Router XBee. (If you write the commands without arguments, the device returns actual values). The ATWR command saves the changes. Remember to use it.
+++
OK
ATID 2001
OK
ATDH 0013A300
OK
ATDL 40B18506
OK
ATWR
OK
Click disconnect and remove the device.
B-Router. Now connect the XBee named B-Rooter. You need to go back to options again and look for the correct serial port (it might be different). Hit connect and repeat the commands. Now you need to put the Coordinator’s Low in the ATDL command.

Step 6. Try it! Connect the a-Coordinator into one PC and the B-Router into the other. Open CoolTerm and choose the right COM port… (If it doesn’t work, check setup parameters with the commands ATID etc or review the steps to make sure everything works fine). In my case when it works, whatever you write in one PC or the other, appears in both! So you have your chat enabled!


One thought on “XBee 001 Basic example: radio-chat between 2 PC”