One year ago, I received many things from Coolcomponents.

among these things, was a Zumo Robot for Arduino.
Today I’m going to show you how to control the Zumo remotely from the computer using an Arduino UNO board and two Xbee. Basically, it’s the continuation of my previous tutorial:
XBee 002: radio-chat between PC and Arduino
this time the Arduino will be driving the Zumo instead of lightning LEDs.
Materials:
- Breadboard
- 2 XBee with USB adaptor
- Arduino UNO
- Zumo Robot
- Few wires for connections
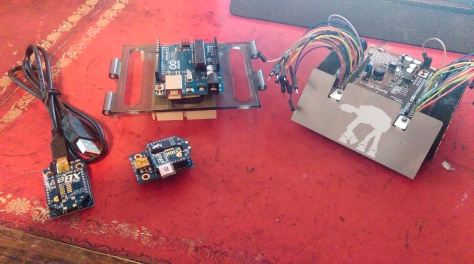
As you can see, I already have done 2 modifications. One of them is that I soldered the wires to the Zumo in order to have connection with my all my Arduino pins. The other modification is that my breadboard is glued on the back of the Arduino.
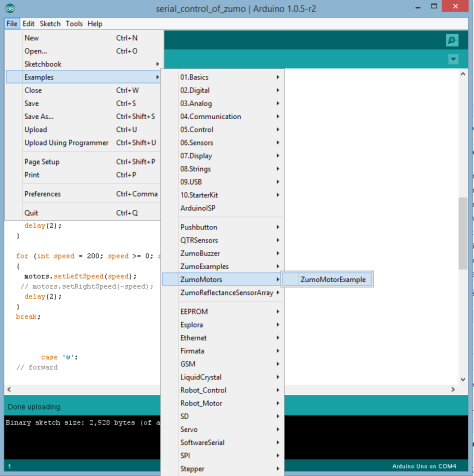
Step 1. Install Zumo libraries on Arduino IDE. You are going to need these libraries in order to send commands to the Zumo shield. Go to Zumo-shield on GitHub and on the rigth hand side, download as a zip. Once you have that file, decompress it, and move each library folder (Pushbutton, QTRSensors, ZumoBuzzer, ZumoExamples, ZumoMotors, and ZumoReflectanceSensorArray) into the “libraries” subdirectory inside your Arduino sketchbook directory. You can view your sketchbook location by selecting File→Preferences in the Arduino environment; if there is not already a “libraries” folder in that location, you should create it yourself. After installing the library, restart the Arduino environment so it can find the Zumo Shield libraries and their examples. You will know that it is properly installed because it will show in the IDE Examples like this:
Step 2. Write code to drive Zumo from serial. Basically, we are going to modify the “ZumoMotor Example” to run the motors for a short period of time when a string is send through the serial port.
#include <SoftwareSerial.h>
#define Rx    4
#define Tx    5
SoftwareSerial Xbee (Rx, Tx);
#include <ZumoMotors.h>
//This script will control the Zumo motors by reading strings through the serial port.
// a w s d will control left forward bakwards and right
ZumoMotors motors;
int inByte = 0;         // incoming serial byte
int speedr = 0;         //speed of left engine
int speedl = 0;         //speed of rigth engine
void setup()
{
   Serial.begin(9600);
    Xbee.begin(9600);
}
void loop(){
  //This will speed down the engine unless a command to speed up is received
  if(abs(speedr)>0){speedr=speedr-speedr/5;}
  if(abs(speedl)>0){speedl=speedl-speedl/5;}
  motors.setRightSpeed(speedr);
  motors.setLeftSpeed(speedl);
  //If a command is received through the serial and it is a driving comand,
  //then it speeds up or down the corresponding engine
  if (Serial.available() > 0){
    inByte = Serial.read();
    switch(inByte){
      case 'a':// turn left
        speedr=speedr+400;
        break;
     case 'd': // turn right
        speedl=speedl+400;
        break;
     case 'w': // forward
        speedr=speedr+400;
        speedl=speedl+400;
        break;
     case 's':// backward
        speedr=speedr-400;
        speedl=speedl-400;
        break;
      }
  }
  if (Xbee.available() > 0){
    inByte = Xbee.read();
    switch(inByte){
      case 'a':// turn left
        speedr=speedr+400;
        break;
     case 'd': // turn right
        speedl=speedl+400;
        break;
     case 'w': // forward
        speedr=speedr+400;
        speedl=speedl+400;
        break;
     case 's':// backward
        speedr=speedr-400;
        speedl=speedl-400;
        break;
      }
  }
  delay(5);
}
To test how it works, simply put the Arduino on top of the Zumo shield and load the code into it. Without disconnecting the USB, turn the Zumo on and the open the serial port on the Arduino IDE.
You migth notice the reference in the code to the XBee. We are going to use the XBee connected as in our previous tutorial (XBee 002: radio-chat between PC and Arduino) the only change is that here we have pins 4 and 5 free (check Zumo shield pins usage here).
Step 3. Write Python code to read Keyboard and print to serial port. First, we need to install pygame, which is a set of libraries and functions designed to program games…. and they are very handy for reading the keyboard.
First, go to the pygame downloads webpage and look for the installation file that match your system and Python version. For me it works
pygame-1.9.2a0.win32-py2.7.msi 6.4MB
Simply run it and it will be installed. Now the code for Python, which is very simple:
import sys, serial, pygame, time
pygame.init()
size= width, height = 60,40
#The next command creates a window,
#everytime you are on that window and press a key
# in the leyboard, it will be analysed and
#if it is one of the driving commands, it will be send
#through the serial port.
screen = pygame.display.set_mode(size)
screen.fill((0,0,0))
ser=serial.Serial('COM7',9600,timeout=1)
key=''
while 1:
    events = pygame.event.get()
    for event in events:
        #This is just to quit
        if event.type == pygame.QUIT:
            sys.exit()
        if event.type == pygame.KEYDOWN:
            key=event.key
        if event.type == pygame.KEYUP:
            key=''
#The command is being send through the serial until we release the key
#Because we have a loop in the arduino and only checks the serial port every
#5 ms, by adding here a 10ms delay we make sure robot follows the orders in real time
    time.sleep(0.01)
    if key == 97:
        ser.write('a')
    elif key == 115:
        ser.write('s')
    elif key == 119:
        ser.write('w')
    elif key == 100:
        ser.write('d')
Step 4. Connect XBee, and enjoy (use same connection diagram for the XBee as in XBee 002: radio-chat between PC and Arduino but changing 6 and 7 pins for 4 and 5.). Our XBee is ready from the previous tutorial, and our code already includes reading XBee or USB… so everything is ready.
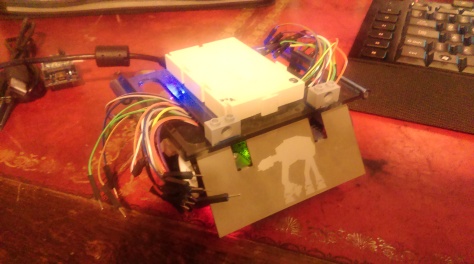
By the way… you might ask why I have 2 Lego bricks on the top… it is for this


One thought on “Python + Arduino + XBee + Zumo robot”